
How to Choose the Best Watercolor Paper, Watercolor Paint Along 3
August 8, 2019 by Rachel
Rachel’s YouTube Channel! If you enjoy watercolor paintings and crafts for children and cats, please consider subscribing to my videos on YouTube.
Hills Across the Lake Paint Along Template
Watercolor paper works differently from other papers because of the sizing added to it. Sizing slows down how wet paint seep into, or spreads over, the paper surface.
Sizing is usually animal gelatin, but some companies use starch for vegan watercolor paper.
Most manufacturers add sizing internally and externally. Sizing is added internally to the pulp to help bind the fibers. External sizing, as said before, helps the paint sit on the surface.
The amount and kind of sizing used varies among the different paper manufacturers.
The best watercolor paper is 100% cotton. If you are just starting out or can’t afford 100% cotton, try for a paper that as least has some rag content. Cotton is naturally acid free so it doesn’t need the additional chemicals that are added to wood pulp.
Watercolor paper is usually thought to come in three different surfaces: hot press, cold press and rough.
For hot press, think of a hot iron smoothing out wrinkles in a shirt. Although in this case, the paper is compressed between two hot cylinders.
Hot press is much smoother than cold press or rough. But it does have a few characteristics that make it a bit tricky to handle. Painting an even wash on hot press is more difficult, and it’s harder to brush on textures. Generally, it’s not the first paper recommended for beginners.
Because the surface is so smooth, it’s good for detail and fine lines. Botanical artists usually use hot press for this reason.
Illustrators who draw with pen an ink like the smooth surface because their pen nibs don’t catch on the paper as they draw.
Not only is the surface smooth, it’s less absorbent than cold press or rough. Because of this, hot press dries more quickly than the others. Depending what you’re working on, that may be a good or a bad thing.
Because hot press is less absorbent than the other two papers, paint tends to sit on top of the surface. This is one of the reasons pigment may appear slightly brighter on hot press than on cold press or rough.
Watercolor paint doesn’t spread as far or as quickly on hot press versus cold press.
Cold press is the most popular and easy to find surface of watercolor paper, and the most often recommended for beginners.
The little pits in cold press and rough are called, dimples, indentations, divots or pockets. The raised bumps are called “tooth.”
Surfaces can vary greatly from one manufacturer to the next. The same surface may appear much smoother or toothier depending on the company. One company’s cold press may be much rougher than another company’s rough. Hot press may also vary from one company to the next but not as noticeably.
The best way to learn about different brands and surfaces of paper is to try them out. Swap sheets with friends if they use different brands or surfaces. Visit brick and mortar art stores so that you can see different papers in person.
With cold press, the pigment can settle more into the pits. The paper gives texture to the painting.
Cold press is sometimes referred to as “not,” as in “not hot pressed.” Rough paper is also “not hot pressed” between cylinders.
Most people associate texture with watercolor paintings, but that texture also has a bit of a downside.
Before I said how paint looks a bit brighter on hot press because it sits on top of the paper surface. Another reason it looks brighter is that hot press doesn’t have the pits and bumps that cold press has. Those pits and bumps may seem inconsequential, but they cast tiny little shadows, which greys the painting.
This becomes more noticeable in photographs. If you photograph your paintings, it’s best to use tow light sources. Light will flood into all the spaces and the painting will look brighter.
Those pits in the surface hold extra liquid. Extra liquid means that cold press takes longer to dry than hot press. That longer drying time means you have a longer window to work whey you’re painting wet in wet. The extra liquid in the pits also means it’s easier to paint even washes of color.
With cold press, you can use the bumps to add texture to your paintings, by dragging you lightly loaded brush over the surface.
Rough watercolor paper is supposed to have deeper pits spaced more widely that cold press, and to have more tooth. But as I said before, the surfaces vary greatly among companies.
Even though rough paper is sometimes smother than some cold press papers you may find, there are some very rough papers out there, especially handmade rough papers, which have unique surfaces.
The toothier the paper, the longer it takes to dry. The rougher the paper, the harder to add line or detail. Rougher papers are more compatible with a looser style and broken color. You may find some subjects fit well with rough paper: ocean waves, tree bark, ruffled feathers, far away mountains.
Besides different surfaces, watercolor paper generally comes in three different weights: 90 pound, 143 pound, 300 pound. Sometimes the weights will be approximate: 260 pound is close to 300 pound.
The weight of the paper affects the thickness and even the surface a bit as well. So even if you buy 140 pound and 300 pound from the same company, you will probably notice slight difference between the surfaces. The heavier the paper, the spongier it may feel, and the more water it will absorb. The heavier the paper, the longer it takes to dry.
Ninety pound is thin and wrinkles when whet, even if it’s been stretched.
One forty pound is thicker, buy may still warp or buckle under heavy washes of color. Stretching can help keep the paper flat.
Three hundred pound is the thickest and most expensive. It can absorb more water but is less likely to buckle under heavy washes. The paper may still warp a bit. Because it’s the heaviest paper, it takes the longest to dry.
Some papers are still made by original method, formed by a mould and deckle. The mould is a 22 x 30 inch frame that holds a taut mesh across its bottom. Paper pulp spreads over the mesh. The deckle frame goes on top. Then the mould and deckle compress the pulp between them and liquid drains out through the mesh at the bottom. Once the paper sheet is dry enough to hold together, it’s removed and allowed to air dry.
Sheets formed in a mould and deckle have uneven edges around all four sides, which is called a deckle edge. Some people use special rulers or edges to rip an imitation deckle edge into a machine made paper.
If you have a sheet of paper that has tow deckle edges running parallel to each other, the paper is machine made.
You can purchase watercolor paper in rolls, by the sheet, in pads or in blocks.
Quality watercolor papers will be double sided, even if the texture is slightly different from side to side. With double sided papers, if a painting on one side isn’t working out, you can let the paper dry and paint on the other side.
The back side of cheaper cold press and rough papers are often smooth and aren’t as good for painting.
To find the “top” side of your paper, look for the watermark in the corner of your sheet or roll. Pads and blocks won’t have watermarks, but they will be bound with their top side facing up.
Watercolor rolls are usually several yards long and are for very large paintings. The paper is machine made with two deckle edges running parallel to each other.
If you paint often, buying full sheets of watercolor paper is usually the least expensive option. You can cut the sheet into the size and shape you want. Smaller leftover pieces can be used for miniatures.
Some companies attach small stickers to the back of the paper. The stickers seem to peel off easily without appearing to leave residue. But once paint covers the mark, it will be slightly visible. So it’s best to avoid painting in that area.
Sheets need protection from being creased or dented. You can buy racks or used a portfolio to store you paper. Storing it between two pieces of cardboard works just as well: keep the paper inside the flat plastic bag it comes inside to help keep it clean.
With pads you don’t need to worry quite as much about protecting your paper. Pads come with chipboard backing that prevents your paper from bending, and a heavy paper cover that protects from dirt and scrapes. Pads are good for travel.
Pads are either adhesive or spiral bound. They come in many standard sizes. You may already know what size you’d prefer to work with. But if not, for starters try one that will give you room to experiment on the sheet, such as 9″ x 12″ or 10″ x 14″.
If you are keeping the paper attached to the pad, you’ll need to let each painting dry ompletely before closing and storing the pad. Also if you work with heavy washes, the paper may warp or buckle.
Blocks are the most expensive option. Like pads, blocks come in all surfaces and in standard sizes.
The back of the block is heavy chipboard and the cover is heavy paper (which can be saved for backing, matting or packing).
Blocks are stacked sheets of paper that have adhesive around all four edges to hold them together. At the top, there’s a small area without adhesive where you can insert a palette or craft knife.
Just run the knife along the edges to release the completed painting from the block.
Because each sheet is held down in place by the adhesive edges, the painting can dry flat and will have less chance of warping.
After the painting dries, you can leave it on the block, or store it by taping the front cover closed.
The best way to learn about watercolor paper is to actually use it.
Here’s an exercise using the same three colors from my Paint Watercolor Leaves video.
If you don’t have Antwerp blue, Aureolin Yellow, or Permanent Rose, use watercolors of you choice. Use any color or combination on any paper you have on hand. The important thing is to get some play time with your paints.
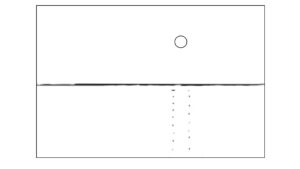
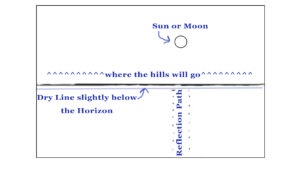
You can print out this template of an imagined landscape above, or just sketch your own.
I painted a thin frame around this exercise just to unify the top and bottom. It isn’t really necessary other than practicing how to handle a brush.
A painting doesn’t need to be perfectly centered and ready for framing. You may even decide the painting would be better cropped differently than you’d planned.
If you watched my previous video about Painting Watercolor Leaves, you’ll remember painting clean water within an area before dropping in paint. The paint should be the consistency of light cream.
Paint the sky area with clean water, keeping the circle dry. Drop in paint until you’re happy with how it looks.
While the sky dries completely, you can work on the lake below. It’s important to save a thin dry line on the paper between the sky and lake at this point. If your paint touches too closely to the sky before it dries, the bottom half of the painting will flood into the top.
Dilute some of your paint mixture with water so that it’s the consistency of juice instead of light cream. Brush this diluted mixture on the lake area without wetting the paper first.
Here and there you can brush a thin line into the reflection path from the sun. But keep it white mostly.
While the diluted paint is still wet, paint a few horizontal lines with the thicker paint near the bottom of the painting. Add a few thinner lines closer to the horizon line.
Wait for the paint to dry. To check if you painting is dry, hold your hand over the surface, if it feels cool, liquid is still evaporating and it needs more time. Some artists use a hair dryer to speed up the drying.
Now that the sky is dry, paint in a few gentle hills with the diluted mixture.
Still using the diluted mixture, paint horizontal lines along the lake to suggest waves. Pull a few lines into the reflection path again, but keep it mostly dry and white.
When the first hills you painted are completely dry, paint overlapping hills with the thicker paint.
Paint broken lines for the reflections under the hills you just painted.


