
Five Minute No Sew T Shirt Mask
May 6, 2020 by Rachel
Rachel’s YouTube Channel! If you enjoy watercolor paintings and crafts for children and cats, please consider subscribing to my videos on YouTube.
https://studio.youtube.com/video/g_WyZKWavng/edit
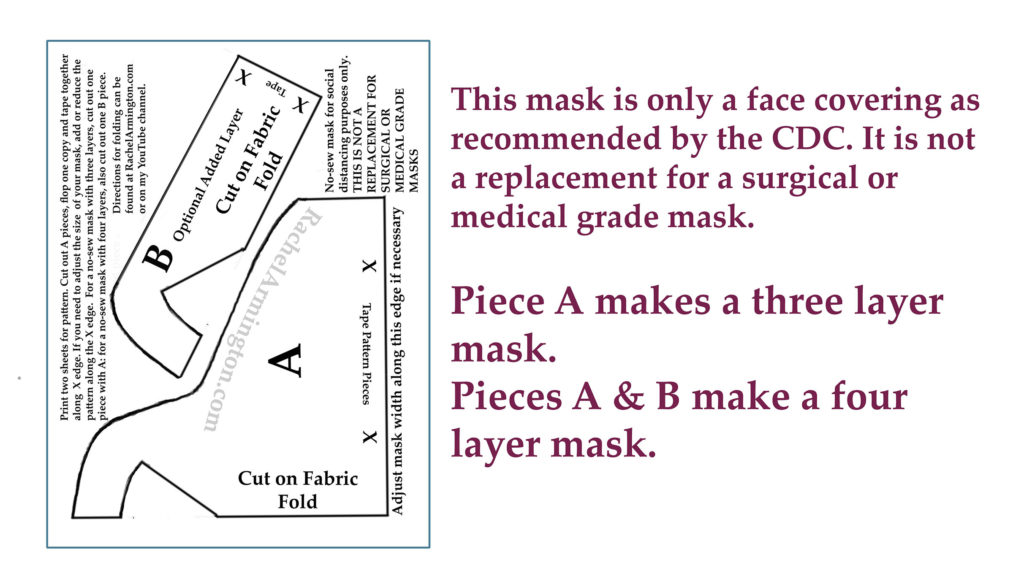
Please note that this mask is only a face covering as recommended by the CDC. It is not a replacement for a surgical or medical grade mask.
Click this link to print the pattern:
No Sew Five Minute Cotton T Shirt Mask Print Pattern
https://rachelarmington.com/no-sew-five-minute-cotton-t-shirt-mask-2/It took me almost two weeks, several different fabric choices and five different modifications of the pattern to figure out this design. This version may not be as lovely as some of the other designs out there, but it’s soft on the face, isn’t uncomfortable for those of us with long hair, and is inexpensive and easy enough to make multiple masks.
You will need:
2 printouts of the pattern,
tape to join the pattern pieces,
T shirt or cotton knit fabric,
a marker to trace the pattern,
scissors.
If desired, you may also need
fabric pins
fabric glue
a disposable filter.
Cutting the seams apart will make it easier to get multiple masks out of a single t-shirt.
Cut off the collar, the shoulder seams and sleeves. Some t-shirts have seams down the sides, which would give you two pieces of knit fabric. If the t-shirt doesn’t have seams along the sides, just cut under one arm pit. That will give you a single piece of fabric to work with.
I was able to make five four-layer masks out of one extra large t shirt.
For a three layer mask, print out two of the patterns, and cut out the A pattern pieces. Tape the pieces together along the edges marked X.
Fold the fabric and smooth (if you’re into ironing, you could iron the fold flat. I’m personally not in to ironing.)
Position the pattern piece on the fold and trace with a marker.
If you’re comfortable just holding the fabric as you cut around the pattern piece, you can skip the tracing part. Personally, I find it best to trace the pattern and then to use pins to hold the layers together as I cut them out of the fabric.
The triangle sections you cut from the fold are the slots for your ears which will hold the mask in place.
If you wish, you can place filter material between the ear slots before you fold the layers of your mask.
You can easily refold the mask after each washing. Or you can use fabric glue to hold the top and bottom edges in place. Only use a line of glue at the top and bottom edges, and you’ll still be able to slip filter material into your mask.
Some t-shirt material is thinner than others and you may want to add an additional layer.
Tape together Pattern Piece B. The ear slots should line up with those in Pattern Piece A.
For a four-layer mask, cut fabric with Pattern piece A as before.
Cut the additional layer on the fold with Pattern Piece B.
Position the B piece of fabric over the larger mask and match up the ear slots.
Use thin lines of glue to attach piece B.
You’ll still be able to slip filter material into your mask.
When putting over your ears, twist each end to make the mask fit snugly.
If the mask is too large, you can add another twist to the ends.
If the mask is too small, you can stretch the knit material to loosen the weave.
If the mask is still too small, you can trim a bit from the back of the ear slots.
You can also adjust the width of the pattern, adding a bit to make it larger or cutting it down to make it smaller.
We store our masks in a shoe box by the door so they are always handy.


