Cat Face Mask with Filter Pocket
June 3, 2020 by Rachel
Rachel’s YouTube Channel! If you enjoy watercolor paintings and crafts for children and cats, please consider subscribing to my videos on YouTube.
Please note that this mask is only a face covering as recommended by the CDC. It is not a replacement for a surgical or medical grade mask.
Because the elastic isn’t sewn directly into the mask, it’s easy to replace the ear loops if the elastic stretches after repeated washing. And fold over elastic is much easier on the ears.
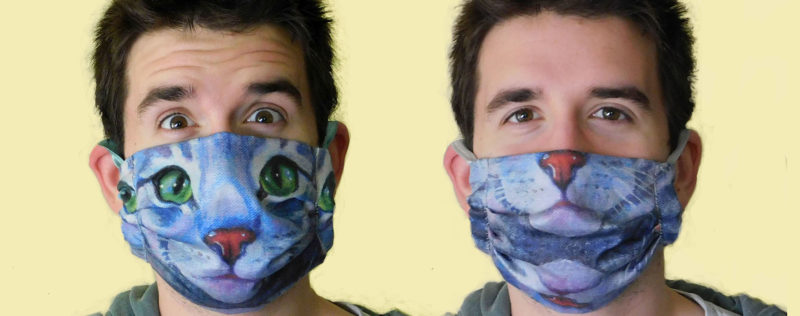
I wanted to design two versions of cat masks with the same fabric. The first version would have the whole of a cat’s face. The second would just have the cat’s nose and chin so that the wearer’s eyes would complete the face.
I took one of my paintings of a cat face and had it printed onto fabric to make masks.
The original painting is acrylic on canvas, so the fabric shows the brushstrokes and texture of the canvas.
The company I use (Zazzle) prints their fabric in the United States so it came fairly quickly. (You can see the fabric I printed at https://www.zazzle.com/grey_tabby_cat_fabric_for_face_masks-256440065131717254
There were a few inches of unprinted cloth along the selvedge edge that I used for making other masks.
Zazzle gives several choices on how to tile the image on fabric. I chose the mirror tile pattern. The tile width for each face is 8 inches.
It also had the highest thread count at 246 per inch. The CDC recommends that masks be made of tightly woven cotton.
For comfort’s sake, I chose Pima 100 percent cotton because I wanted soft fabric close to my face.
Also, to make the ear loops gentler on the ears for extended periods of time, I wanted to use Fold Over Elastic. I had plenty on hand from my two of my previous videos, Easy and Quick Cat Collars You Can Make for Your Kitty and How to Make No Sew Ribbon Bracelets
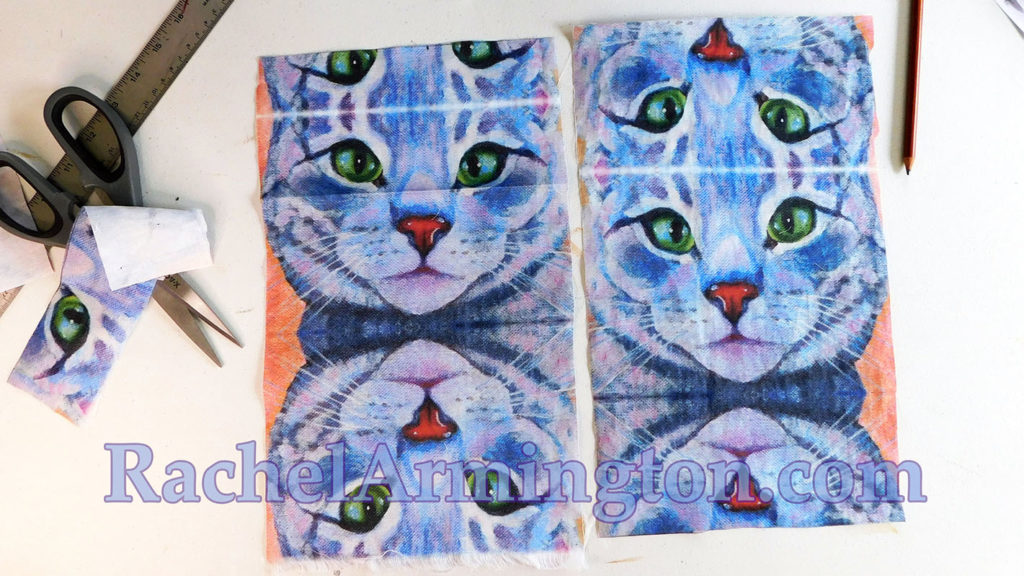
Because the faces are 8” wide, I designed my pattern to use that width.
Where I trimmed each strip of cat faces decided whether the mask would have the cat’s whole face or just her nose. The strip on the left is for a nose only mask, the strip on the right will have the cats whole face.
I used all the same measurements for each version of the mask.
The fabric strip measures 13-1/2” x 8” (you could increase this a bit if you’re sewing for a larger person).
Fold the top edge of the mask down by 3-1/2”. Having the first pleat this long will ensure that there are two layers of fabric over the nostrils, three layers if you use a mask.
Fold up the bottom edge approximately 3”. Before pinning the layers, check to make sure the distance from the folded edges are 6-1/2” apart.
Sew along the side edges.
Turn the mask right side out and iron flat. Starting from the top (nose) edge moving towards the bottom, mark where the pleats will be folded at 1-1/2”, 2”, 3-1/4”, 3-3/4”, 5” and 5-1/2”. Mark the same measurements along the opposite side.
Starting from the top, fold the first pin down using the second pin as a guide where the inside of the fold should land. Pin the pleat in place. Move down to the next two pins and repeat. The second pleat will end up right next to the first.
Fold and pin the pleats on the other side of the mask.
Sew along the edges, securing the pleats in place.
Casing for Earloops
In this design, you’ll sew casing on either side of the mask to hold the earloops in place. For each length of casing, you’ll need fabric that’s 3” wide and approximately 4” long. If need be, you can adjust the length of the casing as you sew it into place.
You can use leftover scraps of fabric to make casings.
Or you can make casing for multiple masks at a time by cutting a strip of fabric that’s 3” wide.
Turn in the edges on each side of the strip and iron flat.
Then fold the strip in half to join the ironed edges.
Double check how tall the pleats made the mask on each side so that you can adjust the casing length if needed.
You won’t want the casing flush against the side of the mask. The casing’s edges should be sewn over the stitches keeping the pleats in place.
This leaves plenty of room for the fold over elastic.
I could easily sew the casing with my sewing machine, but chose to hand sew so I could adjust the length of the casing. It doesn’t take much longer to hand sew in this case.
I’m using 10” strips of fold over elastic. You can adjust this design by simply lengthening or shortening the Fold over elastic ear loops.
For the FOE elastic, clip a safety pin to one end and thread it through the casing.
I’m sewing by hand, but using a sewing machine would work just as well.
I’m using 10” strips of fold over elastic. You can adjust this design by simply lengthening or shortening the elastic.
Clip a safety pin to one end and thread it through the casing.
Overlap the ends by an inch and sew together.
I’ve read that silk makes a better filter than many other materials. I sewed filters from scrap silk fabric I happened to have on hand.


