
Molding Candy from Chocolate Chips
March 22, 2018 by Rachel
Rachel’s YouTube Channel! If you enjoy cooking with allergies, please consider subscribing to my videos on YouTube.
Allergen-free Chocolate
Always, always, check the labeling, and if the labels aren’t clear enough, or you aren’t comfortable with the wording, call the company and ask. Companies may change their recipes, move their facilities, or add new products that might increase the risk of cross contamination. Our list of allergies may be different than yours, but for our chocolate, our family uses Gerbs and Enjoy Life. The pumpkin seeds and dried cranberries that I use in the above video are also from Gerbs. But always, always check the labeling.
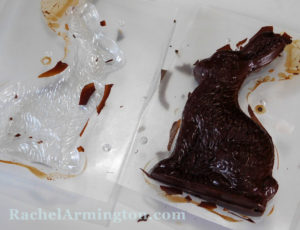
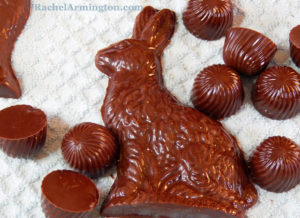
Chocolate Easter Rabbits Filled with Cream
Although in my teens I discovered that my parents both kept their own stashes, I grew up in a home short on sweets (which was one of the reasons I taught myself how to cook). The most exciting holiday candy I did receive each year was a three-dimensional bunny, two hands high, in my Easter basket. When I broke into him, creamy white filling oozed out.
My husband doesn’t remember chocolate rabbits having filling, so perhaps cream filled rabbits was a regional candy (I grew up in Maine, my husband grew up in Europe and the South). The point is that one Easter, my rabbit was empty, disappointingly hollow. I brought this to my parents’ attention. In future years I received smaller, solid bunnies that wouldn’t raise my hopes too high.
A belated disappointment came when I was older, living on my own, and suddenly had access to real chocolate. I realized that the “chocolate” that I grew up with was actually, waxy “chocolate-flavored” candy full of colorant and chemicals. Using chocolate chips as molding chocolate tastes so much better!
My video above shows how to mold a solid chocolate, a bon-bon style candy, and hollow molded chocolate that you can pipe filling into.

Turn Regular Chocolate Chips into Molding Chocolate
Most people, biting into a chocolate bar, don’t realize that their teeth are slicing through crystals formed of cocoa butter. When chocolate melts, those crystals melt. If the chocolate isn’t hardened properly, the crystals won’t reform properly. Tempering is the process of reforming the cocoa butter crystals properly, so that the chocolate hardness with a sheen, breaks with a snap, and has the right consistency in your mouth. You can purchase chocolate tempering machines, or you could grab a candy thermometer and follow the tempering directions or videos online. There are also chocolate compounds that don’t taste as good as real chocolate, but that look the same and don’t require any special handling.
If you just want to mold or dip candies for your family, you can easily temper chocolate chips in your microwave. This method isn’t as exact as others, so if you want to mold chocolates for a bigger event, such as a wedding or baby shower, you might want to invest in a tempering machine.
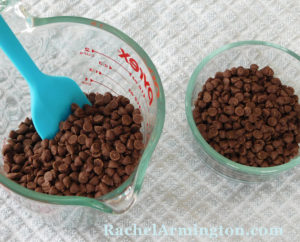
When choosing the chocolate chips you will use, of course first check the labeling for your allergens. Mini chocolate chips work best because they melt evenly and quickly: if you are using regular sized chips or a bar, just chop them up a bit.
Pour your chips into a microwavable dish, then set about a quarter of them to one side.’
Microwave the chips for 20 seconds, then take them out and stir. The chips will look the same, and you might think you don’t need to stir them, but stir them anyway. Then pop them into the microwave for another 10 seconds, take out to stir, microwave for 10 seconds, stir…
How many times you’ll need to microwave and stir depends on your microwave and how much chocolate you are preparing.
When the melted chocolate is glossy and smooth, stir in the quarter of chips that you reserved.
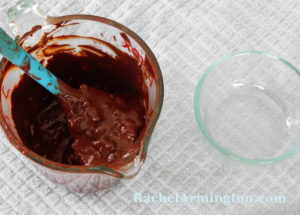
You may need to microwave the combined chocolate once or twice, but try to allow the heat of the melted chocolate melt the chips newly added. The idea behind this tempering method is that the chips added at the end of the process still have their perfectly formed crystals, which act as “seeds” to help the melted chocolate form new crystals as it cools.
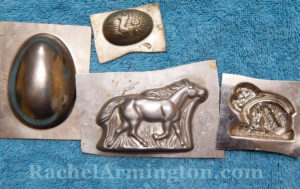
Chocolate Molds: Metal, Silicone, Plastic…
Vintage candy molds were usually made from aluminum: if you can get your hands on them, make sure the inside of the mold is smooth, without scratches or corrosion. There are many modern metal pans for batter breads and cookies that you could also use.
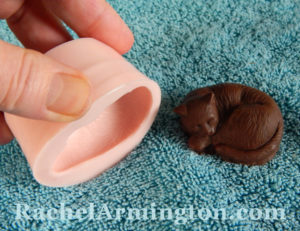
Silicone molds release the candy easily, and sometimes often come in shapes that make three dimensional chocolates. These are often marketed as soap molds as well. After having a bad experience, I’ve come to decide that unless you hold the actual mold in your hand before purchasing, silicone molds can be a hit or miss. I ordered a silicone candy mold online and it was not as advertised: the silicone of the mold has an overwhelming stink of soapy floral perfume to the point I have to keep it in a drawer. Even if the smell were to dissipate over time, I wouldn’t feel comfortable putting food in close contact. On the other hand, one of my favorite molds of a sleeping cat is also made of silicone, and the mold doesn’t have any scent at all.
Polycarbonate chocolate molds are made of thick plastic formed into a sturdy tray that sits flat as the chocolate sets. When releasing the chocolate from the mold, you can twist the tray a bit to loosen the candy but will probably need to thwack it against a flat surface as well.
I find that plastic sheet molds are the most affordable molds and the easiest to release molded chocolate. After the chocolate has set, it’s easy to twist the mold a bit and have the molded candy drop out. The drawbacks are the molds can tear or form bends after multiple uses, they require careful cleaning, and the molds sometimes need to be propped up while the chocolate sets.
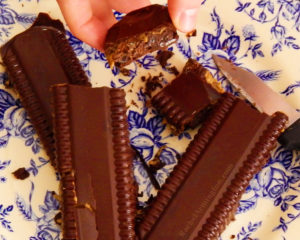
Plastic sheet molds are close, material-wise, to the clear plastic packaging that a lot of our food is comes in. During one blizzard, we used an empty Oreo tray as a mold to make chocolate bars with sunflower butter and rice crisps.
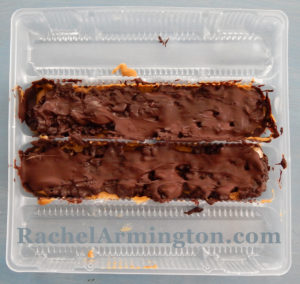
The rice crisps made the bottoms of the bars rough, but the tops were glossy just as they should be, and the chocolate released from the plastic perfectly.
Although it was a fun experiment, I wouldn’t recommend using plastic headed for the recycling bin. Instead, purchase molds that are BPA free and FDA approved.
Molding Chocolate: Shake, tap, cool…
No matter what you use as a mold, make certain that it’s clean and perfectly dry. Chocolate is oil based, and water and oil don’t mix.
Filling a mold is the same if you are making a flat backed, a cream filled, or a hollow form. Spoon tempered chocolate into the cavities, gently shake the mold so that the chocolate flows into all the crevices, then tap the mold against a flat surface to knock any air bubbles out the back.
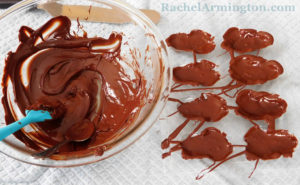
You can see the method of filling the molds in my video above. After filling the mold, put it into the refrigerator until the candy sets, and the melted gloss of the chocolate fades. If you are using plastic sheet molds, you will see a color change where the color seems greyer where the chocolate is pulling back from the plastic.
Storing Chocolate
Although putting the cooling chocolate into the refrigerator helps it set, you shouldn’t store chocolate in the fridge long term. Moisture inside the fridge will cause the chocolate to discolor and may affect the taste. Store chocolate wrapped in a cool and dry area instead.
Filling a Hollow Molded Chocolate Form
As shown in the video above, you can fill molded chocolate candies or hollow 3D chocolate forms with a piping bag and metal tip.
Some suggested allergen-friendly fillings are:
Jelly or Jam: For smoother piping, you may want to stir the fruit spread before spooning it into the bag. Our family has particular fondness for apricot jam. Cherry, raspberry, and strawberry work well too…but I’ve never been inclined to try grape jelly inside of a chocolate.
Seed Butter: Our family favorite is Sunbutter, which is free of the top eight U.S. allergens, including soy, and the top ten Canadian allergens. If the spread is too runny for your preferences, mix in a bit of confectioner’s sugar until the consistency is to your liking.
Fluff Filling: Fluff is a New England vanilla-flavored confection, a bit fluffier than marshmallow creme. Fluff is generally used as a sandwich spread or desert ingredient (in my half of a century, I have never seen any New Englander have Fluff for breakfast, contrary to what some sources say). To vary the flavor, mix in a bit of cocoa or jam.
Fudgy Filling: I’m still working the kinks out of the recipe. I’ll post it when I’ve got the texture right!
Lemon or Mint Filling: I am still working the kinks out of this recipe. I’ll post it when it’s perfectly tasty!
Mix-ins: These aren’t for filling, but they are great if you have leftover tempered chocolate that you don’t want to waste. Mix in raisins, cranberries or other dried fruit, rice crisp cereal, pumpkin or sunflower seeds, or even unmelted chocolate chips. Spoon the mixture into a mold or in little heaps on parchment paper. Let the chocolate set inside the refrigerator, then store in a air-tight container.


